Camera Module
Overview
Camera module has two modes: Record and playback. From Trodes, camera module can be opened by clicking on Video, or can automatically open if specified in the workspace configuration. Camera module will open in the same mode Trodes is in, either record or playback. Camera module will open in playback mode if opened alone without Trodes.
The Allied Vision Manta Camera
Although Trodes is capable of recording video from many different devices, we recommend using the Allied Vision Manta camera with the MCU. The AV Manta supports high-precision frame-by-frame syncing with the MCU using frame sync signals from the camera, as well as synchronization using Precision Timing Protocol (PTP). For more information about setting up PTP synchronization, please see Precision Timing Protocol (PTP) under the Advanced Wiki topics.
Each time a video frame is captured using the AV Manta, a frame sync signal is generated. This signal is used to sync video data with neural and environmental data. The MCU records this signal at the same sampling rate as the neural and/or environmental data. This allows each frame of the captured video to be aligned with high-precision to neural or environmental data.
Install Vimba Drivers (Vimba 6.0)
Vimba 6.0 contains the drivers and transport layers required by your operating system and Trodes and must be installed before using your Allied Vision Manta camera with Trodes. Vimba X should be avoided as Trodes has been optimized to work with Vimba 6.0. Vimba 6.0 can be downloaded from Allied Vision here.
NOTE: Vimba transport layers are required by Trodes and must be included in the installation. They should be included in the default installation, but can be manually selected by using the custom installation option.
Allied Vision installation and setup instructions for GigE cameras can be found here.
Important Notes for Getting Started
The AV Manta must be connected to both the MCU and local computer to function fully.
Video is acquired in Trodes via the Ethernet connection to the local computer. Frame sync signals for alignment with neural and environmental data are acquired via the BNC-to-Ethernet connection between the camera and MCU.
The AV Manta requires a dedicated Ethernet connection that is not shared with other
network connections (e.g. internet, local network, etc.). If your computer is connected to the internet or a local network using Ethernet, a second network adaptor is required. We recommend using the Intel Gigabit Network Adaptor.
The Network Adaptor driver settings must also be configured to allow for large data packets.
This is done by enabling Jumbo Frames and increasing the Maximum Transmission Unit (MTU) to it’s largest setting (~9000 bytes).
The AV Manta must be powered externally using a Power over Ethernet (PoE) device.
Simply connecting to your computer via Ethernet without a PoE device will not adequately power the camera. Most PoE devices should work, such as the Netgear 5-Port PoE Switch.
Connecting to the MCU and Computer
Please connect your camera as follows:
Connect the camera to your computer via Ethernet using the following configuration:
Manta Camera > PoE Device > Acquisition Computer
Connect the camera to the MCU Aux2 Ethernet port on the front of the MCU using the BNC-to-Ethernet adaptor cable
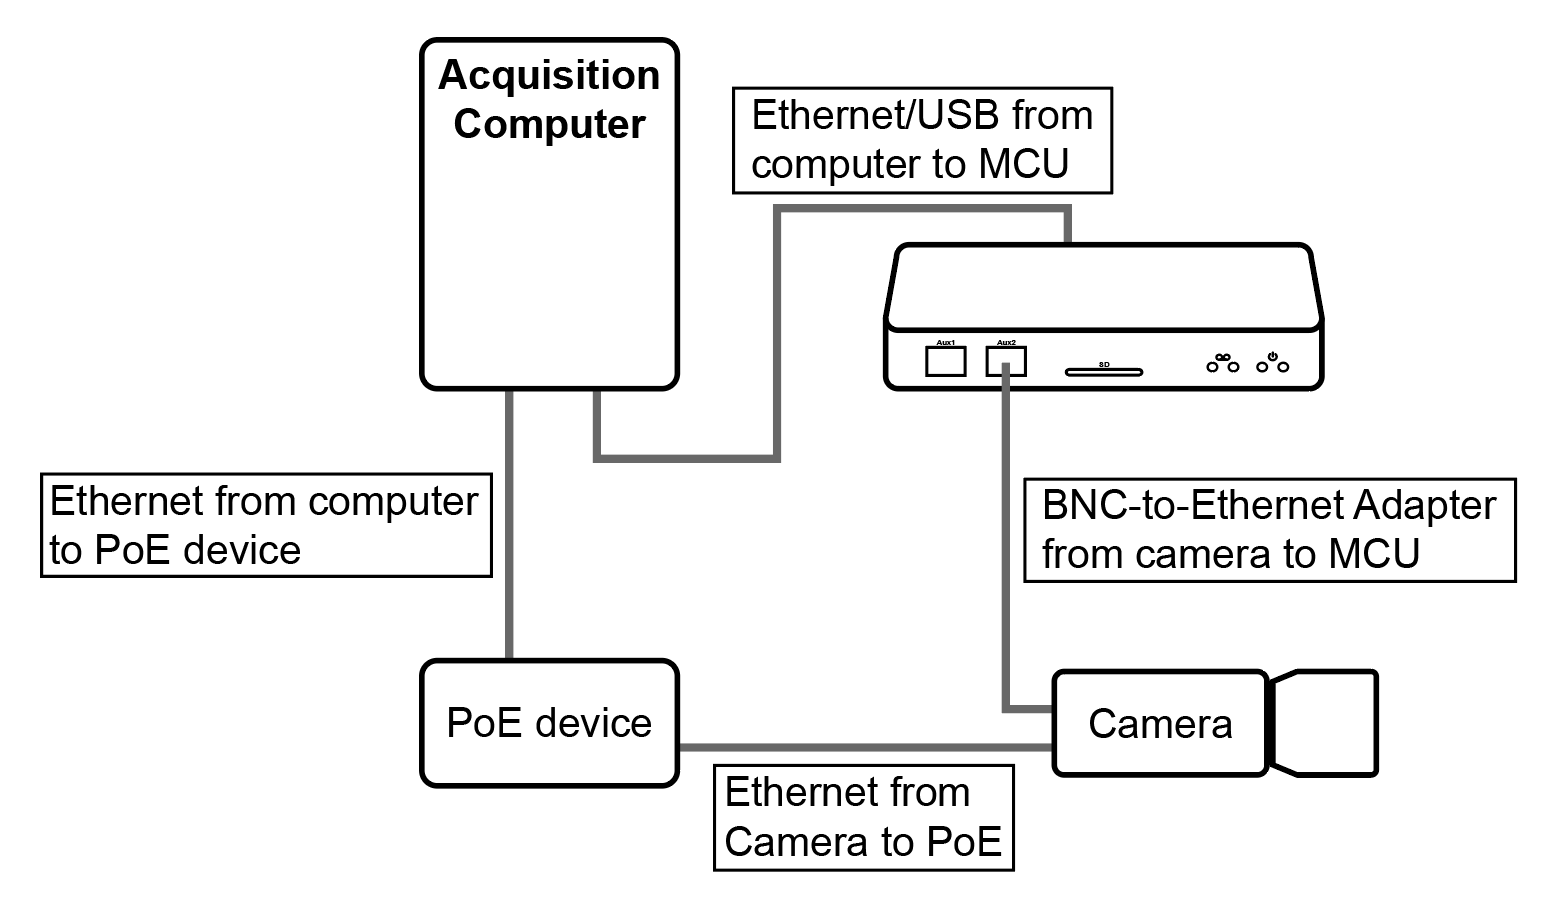
Camera Setup Ethernet Diagram
Recording Video
Open Trodes, open a workspace configuration, and then open camera module. Click on the recording button. The indicator in Trodes should turn green and start counting the time recorded. Camera module should also specify a file that it is recording to and the amount of video recorded.
Position Tracking
Exporting Data
Camera Module has the ability to export tracked two dimensional (absolute coordinate based) and linear (relative position 0.0-1.0 on a defined linear track) as well as its geometry.
Note
All extracted binary files can be read into Matlab using a single function: readTrodesExtractedDataFile.m (in the TrodesToMatlab toolbox). This function will read the file’s header info and data into a Matlab structure. Similarly, the files can be read into Python using readTrodesExtractedDataFile.py (in the TrodesToPython folder).
Two Dimensional and Linear Position Data
Both two dimensional and linear position data can be exported to separate files with the .videoPositionTracking and .videoLinearTracking extensions respectively. This can be done simultaneously during recording or when playing back a file in Camera Module’s standalone mode.
To export tracked position data during recording by simply pressing the “Track” button after opening a new .rec file. This will export both two dimensional and linear tracking data to their respective files.
Note
To export linear position data you must have first defined a Linear Track using Camera Module’s ‘Linear’ Tool.
Off-line tracking
To export (or re-export) tracked position data from a previously recorded video file, launch cameraModule in standalone mode (i.e. run the cameraModule executable directly, rather than launching it from Trodes. Then click ‘File’ to open the desired *.h264 video file. Set up your track geometry (or load it in using the File menu), adjust your tracking settings (under the ‘Settings’ button), and set the start/end time points for tracking using the small circular sliders in the time bar. You can play the video and skip around to make sure you are happy with the tracking/linearization.
When you are ready to write out your tracking data, press the “log” button. Select a file name and save location, use the scrubber to reset the video to the desired start point, and then press the green play button. This will export all position data from your current position in the video file onwards. Like before, you must have a Linear Track defined to export a linear tracking file.
Note
The “Log” function may occasionally pause while scanning the file. This happens when Camera Module cannot find one of the LEDs it is using for tracking the animal’s location. You can scrub forwards and backwards one frame at a time to inspect the local tracking information. If everything looks correct, click the play button to continue the tracking. If not, you can manually update the LED position on a frame-by-frame basis (‘Fix mode’)
In ‘Fix mode’, you can manually update the estimated position of the tracking LEDs. (In 2-LED mode, left-click to update the position of the front/green LEDs, and right-click to update the position of the rear/red LED array.) Note that if you update the LED position, then scrub backwards and forwards in time using the arrow keys, you will (apparently) lose your updates, so inspect the frames before making your fixes.
When you have finished with the manual fix, click the play button to continue automatic tracking.
Once you have completed tracking for the session, click the ‘Log’ button again to close the tracking files.
Geometric Data
Using Camera Module’s tools it is possible for the user to superimpose a variety of different geometries over the video feed. You can export several of these geometries, specifically Linear, Range Line, and Zone geometries, in the following fashion:
Navigate to the ‘File->Geometry->Save geometry…’ menu.
Select which type of geometry you want to save, pick a name and location to save the geometry file at in the popup file browsing dialog, and click ‘Save’.
The selected geometry is now saved to a file with the ‘.trackGeometry’ extension.
All geometries are also automatically saved when utilizing the ‘Log’ function in playback mode, and when making a new file recording.
Event Detection
The camera module also has the ability to detect events and plot the animal’s position when they occur. For example, by clicking on the Tools button and selecting Zone, you can draw a polygon with the mouse. Set up an event connection, detailed below, and when the animal enters the zone, a point will be plotted on the video. You can also plot points at the animal’s position when a spike enters a defined cluster.