2-way Radio Link
About 2-way Radio Link
2-way Radio Link enables logger status and battery monitoring, while also increasing allowing the user to independently or globally control up to 8 loggers simultaneously. This link enables back-and-forth communication between the logger and control unit (MCU or Logger Dock2). This includes detailed real-time information about logger state and battery charge status. This information is viewable in Trodes for all connected loggers and empowers the user to make informed experimental decisions on the fly. The Logger Status window is accessed by clicking the Remote Control button in the upper left of the Trodes interface.
Each paired and connected headstage will have its own info card in the Logger Status window in Trodes, and the window will expand based on the number of connected loggers. Devices are always displayed in order based on pairing slot assignment. Each connected logger can be controlled individually using the command buttons within its designated info card, or global commands can be given to all paired loggers simultaneously using the Global control buttons found at the top of the Logger Status window.
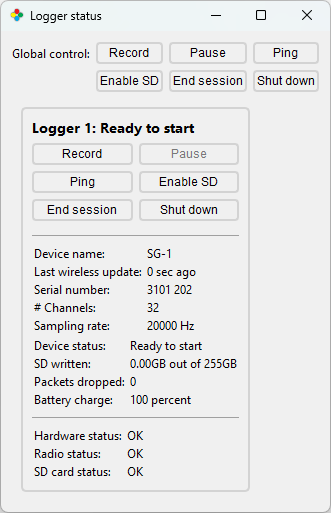
Logger Status info card
This interface also includes a headstage Ping command, which can be issued to one or all connected devices, causing the logger’s LEDs to illuminate briefly for easy visual identification with a single button press.
2-way Radio Link also enables the ability to pause the logger. When the logger is paused, it goes into a low power standby mode. This enables multiple recording epochs within a single recording session with minimal impact on overall record time.
The following hardware and software are required for 2-way Radio Link: - 2-way Radio Link enabled Logger (Sprite32 & Pixie384) - Logger Dock 2 - Trodes 2.6.0 or newer
Pairing and Hardware Settings
Initial headstage pairing requires a hardware connection with the control unit. During pairing, each logger is assigned a specific “slot” in Trodes (1-8). The slot assignment is selected by the user and saved to the logger for future recording sessions. Once paired, the logger will automatically be recognized by the control unit and Trodes. Slot assignment and device pairing can be updated by the user at any time.
NOTE: Streaming in Trodes is required for 2-way communication with the logger. This means the control unit must be powered and connected and Trodes must be actively streaming from source before logger status can be viewed or commands can be issued. Powering down the control unit will immediately end the recording session for any connected devices.
Open Trodes and create a new Workspace with channel count set to zero.
Connect headstage to the control unit (using HDMI, or for the Sprite 32 the provided USB to Omnetics PZN cable).
Connect to your control unit in Trodes using either USB or Ethernet as the interface.
Open the Hardware Settings window under the Settings dropdown menu.
Select the 2-way checkbox and 20 kHz sampling rate from the dropdown menu under the Controller Settings heading.
Selecting the “Tie headstage and controller settings” checkbox is recommended as this ensures consistent settings for both the environmental and neural recordings.
Hit Apply to save settings to the headstage.
Open the Pairing menu using the Pairing button and select the preferred headstage slot by clicking Add/replace. Paired headstages can also be pinged or disconnected using this menu.
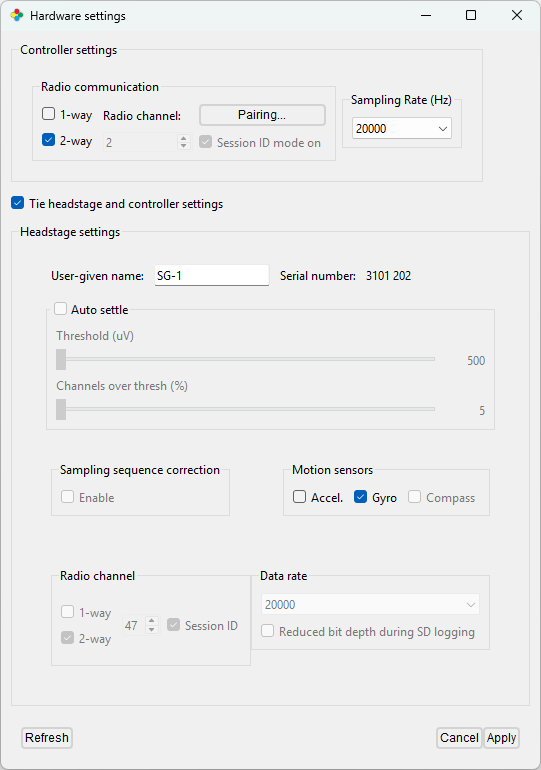
Trodes Hardware settings
The Trodes hardware settings menu is used for configuring both 1-way and 2-way radio link capable headstages. As such, not all settings in the menu apply to all headstages. For instance, Sprite32 does not support Auto Settle, Sample Sequence Correction or reduced bit depth during SD logging.
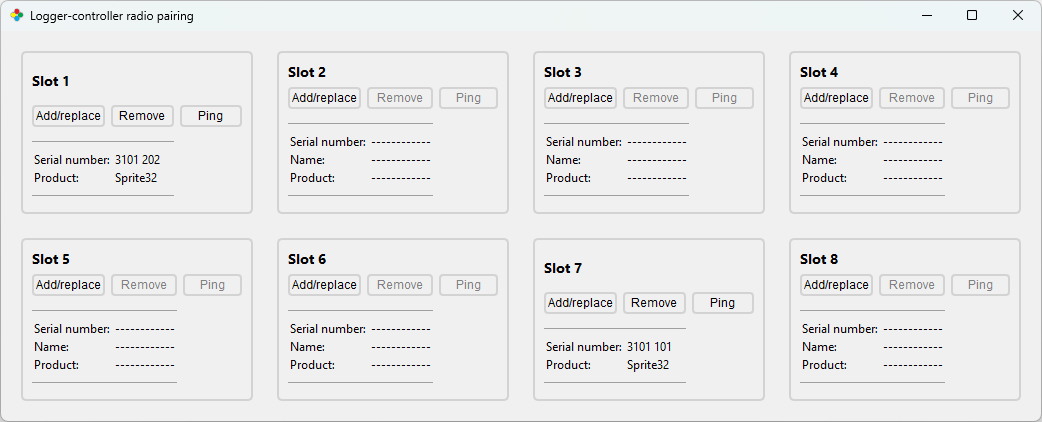
Trodes 2-way pairing menu
Recording Workflow
SpikeGadgets heastages log neural data to removable microSD storage on the device. Environmental data are recorded by the control unit and saved to the local computer using Trodes. Neural and environmental data are merged and synchronized following the experiment. Once data has been merged, specific data bands such as Raw, Spike band, LFP, or environmental data can be extracted for further analysis.
2-way Radio Link enabled loggers can also be used to take multiple recording epochs during a single session using the recording Pause feature. When recording is paused, the logger goes into low-power standby mode, minimizing the impact on available record time. The data extraction and merge process is the same as with single epoch recordings.
Below is a step-by-step workflow for using a logger equipped with 2-way Radio Link. The Sprite32 logger is used as an example.
Open Trodes and create a zero channel workspace with the following settings:
Under Amplifier/Probe technology select “None (environmental recording only),” and set the sampling rate.
Under the Auxiliary Display tab remove Controller_Din4-6 and add Controller_Ain1. These are the digital and analog environmental data input channels on the Logger Dock.
Save and open the workspace.
Connect your Dock in Trodes by selecting the following from the Connections dropdown menu: Source > SpikeGadgets > Dock(USB)
If you have not done so already, pair your logger with Trodes using the instruction in the previous section.
Begin streaming in Trodes by selecting “Stream from source” under the Connections dropdown menu.
Click the Remote Control button on the upper left of the Trodes interface to open the Logger Status window. All logger monitoring and command takes place here. Each logger will automatically appear in the slot it has been paired with when connection is established.
Disconnect your Sprite32 from the USB charging cable, insert your microSD card and turn the Sprite on using the power button on the device. All 3 LED indicators will flash white when the device initializes. You should then see the following:
Initiate your environmental recording in Trodes by selecting “New recording” under the File dropdown menu, then hitting the record button.
If you do not intend to record environmental data, this step can be skipped. Trodes must however remain streaming for the duration of the neural recording. Sprite32 will automatically stop recording if the Dock is powered down, or if streaming is ended in Trodes.
Initiate your Sprite32 recording by clicking the Record button in the Logger Status window.
To end the Sprite32 recording simply click the end session button. The environmental recording can be ended by selecting Close File in the File dropdown menu; Trodes will continue to stream.
To end the recording and stop streaming simultaneously, click Stop streaming from source under the Connections dropdown menu.
Synchronization
Synchronization between the environmental recording taken by Trodes on your local computer and the neural data recorded to SD on the Sprite32 is done via a 2-way radio link. The control unit can be paired with up to 8 2-way enabled loggers simultaneously and sends sync signals at 80 Hz. The control unit sends sync signals to each logger by cycling through each of the 8 pairing slots. This results in a 10 Hz sync signal for each logger. Each sync signal is recorded by both the logger and control unit at the same sampling rate as the neural and environmental data.
During the data merging process, the sync signal timestamps recorded in both data files are aligned, and the sample count between signals is compared. If a difference in sample count is identified, small local adjustments are made to the environmental record to maintain alignment. This eliminates drift and results in high alignment precision throughout the merged recording.
Transferring and Merging Data
Before analysis can occur, data recorded to SD must first be extracted or merged to .rec using the DataLoggerGUI application packaged with Trodes. Extraction appends the data with Trodes workspace settings such as channel mapping and saves the data in .rec binary format. Merging combines and synchronizes the neural and environmental data using the alignment process mentioned above to produce a single .rec file containing all data.
The following files are required when merging data: 1. The neural data file recorded to microSD on the Sprite32. 2. The environmental event data file recorded by Trodes to the local computer. 3. A Trodes Workspace file to append to the merged file*. This workspace file must contain all neural and environmental data channels.
*NOTE: This is NOT the Workspace file used to record the environmental data, but rather a Workspace that contains both environmental record settings as well as the probe and channel setting used by the headstage when logging the neural data.
Merging data with DataLoggerGUI and Logger Dock
Power down the headstage, remove the SD card and insert it into an SD card reader (SD to USB3 dongle) and connect to your computer.
Open the DataLoggerGUI application found in the Trodes application folder. If using Ubuntu, you will need to run as sudo to gain access to the SD card reader.
The SD card reader will be listed under the Detected Storage Devices with storage size, type and SD card status listed.
Under Extract, select your .rec file and corresponding Workspace .trodesconf file, and set your extracted data directory.
Hit START.