Data Logger GUI
The Data Logger GUI is a standalone application packaged with Trodes that provides a convenient way to download neural data recorded during an untethered experiment from SpikeGadgets’ data loggers and merge that data with simultaneously recorded environmental data from the control unit .
It can be used in conjunction with the SpikeGadgets’ Logger Dock or Main Control Unit (MCU). The Data Logger GUI can be opened directly, or from Trodes using the “Merge with logger data” menu item under “File” when an environmental record is opened in playback mode.
Mounting SD Cards
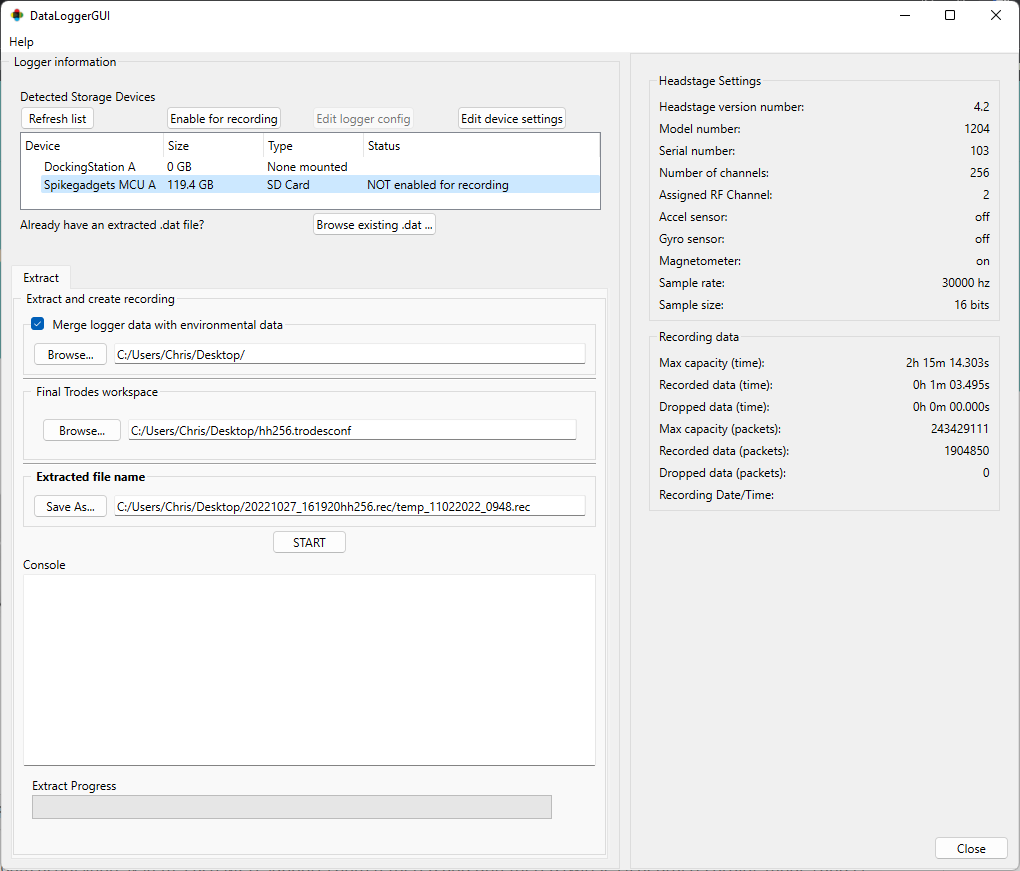
figure 1: Data Logger GUI with SD card mounted in MCU
Once you have finished your recording, you need to download the data to your computer. This can be done using your control unit (Logger Dock or MCU), or by directly connecting the SD card to your computer (Trodes 2.5 or later).
Control Unit
To start this process, insert the SD card into the Logger Dock or MCU. The Logger Dock or MCU should be turned on and connector to your computer via a USB connection. After opening the Data Logger GUI, The SD card will be listed with the control unit you are using under “Detected Storage Devices”. If your control unit does not appear on this list, click the refresh list button, and it should appear.
NOTE: The MCU must be running firmware version 3.19 or later to be used with the DataLoggerGUI.
The SD card will appear in the device list under the “Type” heading of your control unit, with information about card size and status listed. If data has been recorded on the SD card, the right-hand Headstage Setting panel will populate with information about the recording, and the card status will indicate that the card is “Not enabled for recording”. This is a safety feature to prevent accidental erasing of data before it had been downloaded to your computer. After you have downloaded the data, you will need to enable the card for recording before it can be used to record with a SpikeGadgets datalogger again. This is done by clicking the “Enable for recording” button.
Direct access
Downloading your SD using direct access is a new feature in Trodes 2.5. Direct access allows you you to connect your SD card directly to your computer via a USB SD card reader connected to your computer, or your computers built-in SD slot (if it has one). This method of data download can be up to ~4x faster than downloading your data using the Logger Dock or MCU; speeds are limited by your computer’s hardware. For optimal download speeds, a USB 3.0 SD card reader or built-in SD card reader are recommended.
WARNING: Please read the notes for use below, incorrect usage of this feature can result in catastrophic data loss!
Important notes about using Direct Access:
In addition to downloading data, this feature can also be used to enable your SD card. Extreme caution must be taken to avoid using this feature on any remote storage device that is not SD storage intended for untethered data logging. This is because enabling the card removes all file architecture from the storage device. For any normal storage volume this includes any drive partitions, which are necessary for your operating system to recognize the drive and read the data. Several safeguards have been implemented to avoid accidental data loss.
Only removable storage devices are listed. This makes it very unlikely that the drive containing your computer’s main storage and operating system will be selected (unless you are using removable drives for these purposes, which is rare).
The DataLoggerGUI requires Administrator privileges (Windows) or Superuser access (Linux).
The GUI looks for a partition table before initiating any changes to a connected device. If a partition table is detected, the GUI will ask you to confirm your action before it will be initiated. All removable storages devices under normal use require a partition table to be recognized by your operating system. Under normal circumstances, the only time a partitioned device should be enabled is when enabling an SD card for the first time prior to recording.
Windows-users:
When connecting an SD card used for logging data to a Windows computer, the operating system will immediately ask you to format the drive. This should be avoided! Formatting the drive will erase all data recorded to the SD card.
Updating Control Unit and Headstage Settings
The DataLoggerGUI can also be used to update control unit and headstage settings such as radio frequency (RF), sampling rate and session ID for untethered recording. The MCU must be running firmware 3.19 or later to update MCU settings or headstage settings, with the exception of the ML32, which can be plugged into the Logger Dock directly.
Updating control unit settings: Control unit settings can be updated by selecting the desired control unit (Logger Dock or MCU) from the Detected Storage Device list, then clicking the Edit device settings button above.
Updating data logger configuration: For some data loggers, configuration settings can be updated by selecting the desired data logger from the Detected Storage Devices list, and clicking Edit logger config. To do this, your data logger must be connected to the MCU via HDMI tether or docked on the Logger Dock.
Extracting Data and Merging With Environmental Record
Most users will record two data files during an untethered experiment:
1) the neural recording on the headstage SD card, and 2) the environmental
recording (.rec file) taken with Trodes, which may be linked to other
files such as video.
These 2 files can be aligned and merged into a single .rec file using the radio frequency (RF) sync
pulses embedded in each file. These RF sync pulses are transmitted from the control unit with a 10-second
interval (for most setups) and are recorded by the Control Unit and headstage. More information about Untethered
Data Synchronization can be found here.
To merge the neural data with the environmental data, make sure the checkbox
next to “Merge logger data with environmental data” under the “Export” tab is checked. If you opened
the DataLoggerGUI application from Trodes, the path to the environmental recording
will already be populated. If you opened the application directly, you will need
to browse to the relevant environmental .rec file.
Next, you will need to select the “Final Trodes workspace” file. This workspace file will be appended to your recorded data, and will include the relevant header data for your neural recording. Importantly, this is not the workspace file used to record your environmental data, but rather a workspace containing all the settings used for both your neural recording, and your environmental recording.
One easy workflow for creating the necessary workspace files is to begin your experiment by creating a workspace that includes all neural data channels, channel mapping, nTrode assignment and environmental IOs. Once you have saved this “final” merge workspace, simply change the neural data channel count to 0, and open the workspace. This zero-channel MCU workspace will be used to record your environmental IOs, and can be saved separately.
For more information about workspace creation, see the Workspaces subsection of the Trodes wiki.
Finally, you will need to specify a filename for the merged data file. The DataLoggerGUI will create a default filename, which can be seen under “Extracted file name,” but this can be edited to meet your needs.
Click the “START” button to begin the extraction and merging process.
The DataLoggerGUI will first extract the SD data and save it in .dat format to the directory specified in your Final
Trodes Workspace. This file will be called logger_raw.dat. The DataLoggerGUI then converts this data to the .rec format,
appending the final workspace setting to the data. When merging, the MCU data contained in the specified .rec file is synced
and merged with the SD data, resulting in the final merge .rec file containing all data from both input file.
A note on SD data extraction: Extraction can be a long process for large files, but only needs to be done once for any given file.
Once the logger_raw.dat file has been saved to disk, any subsequent merging processes can be done by selecting this file on disk;
bypassing the extraction stage. This is done by selecting the “browse existing .dat …” option below the Detected Storage Devices list.
This also holds true for situations where an error occurs during the merge process. Because the data is saved to .dat prior
to merging, any subsequent merges can be done by selecting the file on disk.
Converting to .rec without merging: If you would like to simply convert your SD to .rec without merging, uncheck the “Merge logger
data with environmental data” checkbox, and select a final workspace that contains only the neural data settings.
Importantly, when creating this workspace, the “multiplex_IO” hardware device s
Process Output
When the START button is pressed, the extraction process will begin. The “Console” window will display the output of the process, with percentage complete indications and potential errors or warnings displayed. For large files, this process may take several hours.
As mentioned in the previous section, when the extraction process is complete, the extracted file will be saved to your computer in the same folder as the designated output file. This is to expedite any subsequent merge processes.
Next, the merge process will begin. This process is generally fairly fast. Percent
complete will be shown in the console window, along with any errors or warnings. If the
process completes without errors, the merged .rec file will be saved to your computer
automatically. Please review the “Console” output of the merge process to check for any errors
or warnings that may need your attention:
Excessive drift During the ongoing merge process, every time a synchronization signal is detected the program will display how far apart the two files have drifted. It is normal for the two files to drift a few dozen samples every ten seconds. However, drift in the thousands of samples points to a larger problem that needs to be addressed.
Excessive dropped data Every time data are dropped in either the environmental file or the neural data file, a warning will be printed to the console displaying how may packets were dropped. A few hundred packets here and there is generally not a problem, but excessive drops will also need to be addressed, and likely indicates that the SD card was not fast enough to record the number of channels used on the headstage.
All alignment corrections (due to drift or dropped packets) give priority to the neural recording. This means that any alterations made to maintain alignment will occur in the environmental data file. Data are either filled in or taken out of the environmental recording to accomplish this. When data are filled in, the last digital or analog values are repeated.
Once extraction and merging are complete, if you opened the DataLoggerGUI from Trodes, clicking
the “Close” button at the bottom right of the window will trigger Trodes to automatically open
the resulting merged .rec file in playback mode for inspection.
SD Card Enable
Once a SD card has been used to record data, it must be re-enabled before it can be used to record again. This prevents data on the SD card from being accidentally overwritten. This must also be done when using a SD card for the first time. The SD card can be enabled either using the DataLoggerGUI, or the MCU (if running firmware 3.19 or later).
DataLoggerGUI: Mount the SD card to either the Logger Dock or MCU (if running firmware 3.19 or later), select this relevant device from the device list in the DataLoggerGUI, then select the above “Enable for recording” button.
MCU: Mount the SD card to the MCU, then press and hold the left button on the MCU. The left LED will rapidly flash red for a few seconds while the card is being enabled. Once the card has been enabled the LED will return to solid green and the button can be released.
2-Way Radio Link: Wireless SD card enable via Trodes is available for loggers equipped with 2-Way Radio Link (Sprite32 & Pixie384). This is done by clicking the SD enable button for the paired logger in the Logger Status window in Trodes. This feature requires Trodes 2.6.0 and a logger equipped with 2-Way Radio Link such as the Sprite32 or Pixie384.