Quickstart Guide
Getting started with SpikeGadgets Main Control Unit (MCU) and Trodes
Introduction
In this guide we will go over the basic workflow needed to take your first tethered recording using the SpikeGadgets Main Control Unit (MCU) and Trodes, but does not fully discuss the basic functionality of many Trodes features. It is highly recommended that you read the Basic Usage Wiki page to familiarize yourself with general Trodes functionality.
The recording basics covered in this guide use the HH128 headstage as the example. While much of this information will be broadly applicable to other SpikeGadgets headstages, additional setup may be required for headstages such as the Modular Stacking Headstage, the Neuropixels Probe Headstage, or the ML32 Headstage. For specific information about recording with other SpikeGadgets headstages, please see our Product User Manuals.
Throughout this guide you will find links to the broader Trodes Wiki, where you will find additional information about the topics covered, as well as information about the many other features Trodes has to offer!
The latest version of Trodes can be downloaded here.
Information about untethered recording can be found in our wiki guide on untethered recording, or on YouTube in our Untethered Recording Tutorial Series.
Getting Started
Before getting started with Trodes, a few steps need to be taken to ensure that your computer and Trodes will be able to properly communicate with the MCU via USB and Ethernet. The specific setup steps will depend on your operating system. It should be noted that while it is possible to set up only USB or only Ethernet, it is strongly recommended to set up both connection types before getting started. This is because some functions are restricted by connection type due to bandwidth or other limitations.
Ethernet is required for recording greater than ~400 channels due to USB 2.0 bandwidth limitations.
USB is required for the following:
Importing SD data recorded during untethered recording.
Using the probeConfig Windows utility used for configuring Neuropixels probes.
Connecting to the Logger Dock.
Please follow the connection setup and Trodes installation instruction found here.
Creating Your First Workspace in Trodes
The first step when preparing to record using Trodes is to create your Workspace. This is done using the Workspace Editor. Workspace setup is where you will set up and store the hardware and software configurations for your experiment. Workspaces are saved to the .trodesconf format and can be used for subsequent experiments, or sharing with other users.
Workspaces are highly customizable to meet experimental needs with access to many advanced settings. This guide only covers the basic Workspace functions. More detailed information about Workspace settings can be found here.
Below we will walk through setting up a basic tethered recording experiment using the Workspace Editor, then we will cover how to playback a recording using a previously recorded sample dataset.
As mentioned above, this guide will just be scratching the surface of what Trodes can do, so feel free to explore the Trodes Wiki for more details. Each link heading below will take you to the relevant subsection of the wiki, where you will find more information about specific topics and functions!
For information and video tutorials about setting up untethered recordings, please see the getting started with untethered recording and Data Logger GUI sections of the wiki.
Setting Up Your Workspace
Open Trodes and select “Create/Edit Workspace.”
Select “From Scratch” to open a new Workspace in the Workspace Editor.
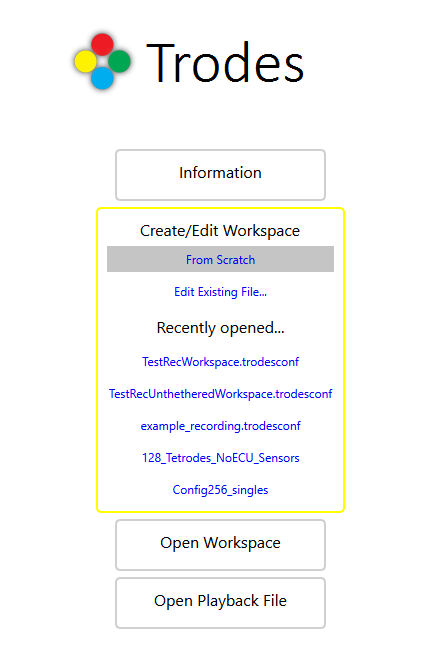
figure 1: Creating a new Workspace “From Scratch”
Under “General” click the empty field next to “Set File Path.” This will open the file explorer, allowing you to set the default save directory. “Set File Prefix” allows you to enter a default prefix that will be added to your recording file(s).
Next, under “Hardware Configuration,” select your amplifier/probe type by scrolling through the available options using the arrow buttons. Hitting the Select button will confirm your choice and reset channel mapping settings to default.
**NOTE: For Untethered recordings, the channel count must be set to None regardless of headstage type. Sampling rate should still be set to match your headstage settings. **
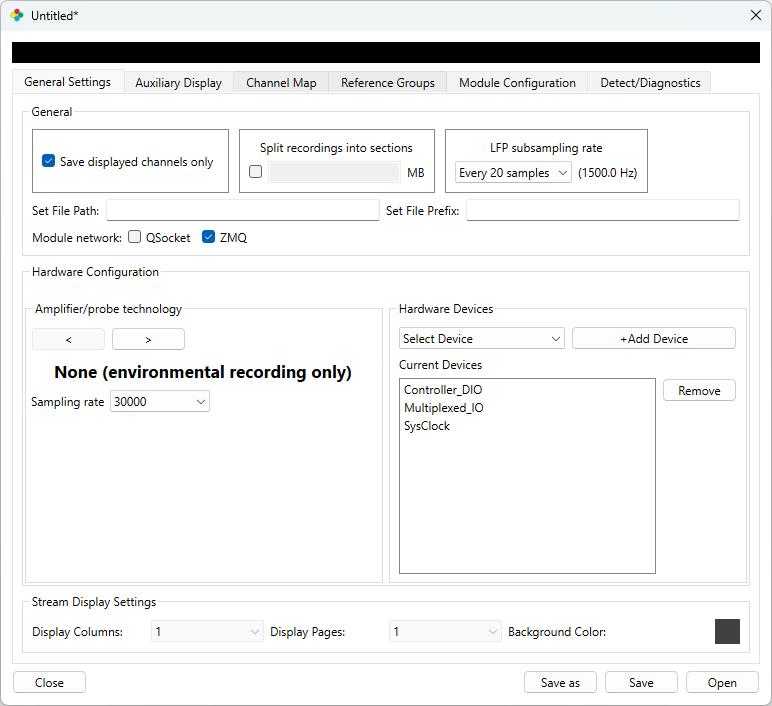
figure 2: Selecting headstage channel count
The Channel Map tab is where you will assign individual electrode channels to groups called nTrodes. Each channel also includes additional fields, where additional information such as stimulation capability, channel location, sorting and display order can be specified.
This information can be entered directly for each channel in Trodes, but for most recording configurations we recommend using a 3rd party spreadsheet application such as MS Excel to help create your map.
Once you have created the channel map spreadsheet it can be imported using the “Import channel map” button. For more information about this see the Channel Map section of the wiki. If custom channel mapping is not required select “autopopulate.”
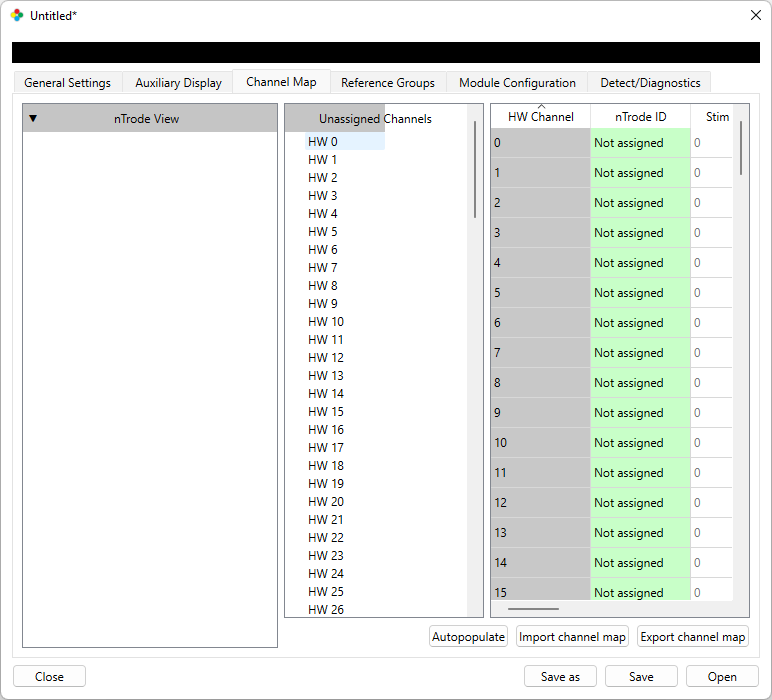
figure 3: Channel Map tab in Workspace editor
Once you have either selected “autopopulate,” or imported your channel map, Save and/or Open your workspace.
Using Your First Workspace
Connecting your MCU & headstage for tethered recording:
If you have not done so already, connect your MCU to your computer using your preferred method (either USB or Ethernet), and power on the MCU. If you have not connected your headstage yet you will notice the right-most status LED flashing orange. This indicates that the MCU is powered, but no headstage is detected. This LED will change to solid green once your headstage has been connected and it recognized by the MCU.
Your headstage should be connected to the source input port on the back of the MCU using the HDMI tether provided. This the the rightmost port when looking at the back of the MCU and is labeled using a spike waveform.
NOTE: Any SD card inserted into the headstage or MCU must be removed before tethered streaming can be initiated.
Now that your MCU and headstage connected, you can link your MCU to Trodes by selecting your preferred connection method under the connection dropdown menu in your workspace:
Connection > Source > SpikeGadgets >
Trodes lists the connection status in the upper right of the Workspace. Prior to connecting to the MCU, the STATUS box will read “No source.” When a connection has been made with the MCU, this will change to “Connected to source.”
Taking Your First Tethered Recording
Begin streaming by selecting “Stream from source” under the Connection dropdown menu. The workspace will now begin streaming data from the headstage. You will only see neural data streaming when taking a tethered recording. If you would also like to record video data, you can do this by clicking the “Video” button at the top of the workspace, which will open the video module.
Now, create a new recording by selecting “New recording…” under the File dropdown menu. You will be prompted to set the filename and save directory for your new recording.
With the save directory set, you will see the record and pause buttons in the upper left corner of your workspace. Pressing the record button will initiate your first recording. Importantly, untethered recordings cannot be paused, but tethered recordings can be paused and restarted at any time.
When you are ready to end your recording, press the pause button. This will pause the recording, but will not pause the data stream. To end the recording, disconnect the data stream by selecting the “disconnect” option under Connection dropdown menu.
Viewing Your Data
Now that you have taken your first recording, you can view the data you recorded inside Trodes. If you have not yet taken a recording, you can also download a sample dataset here.
To open your data file either select “Open Playback File” from the main menu on the landing page of Trodes, and click “Browse” to find your data file (.rec file), or select “Playback last recording” from the File dropdown menu in your workspace. From here you can playback your data by clicking the Play button in the upper left corner, which will playback your data in the same view it was acquired in.
Video files captured while recording can also be viewed by clicking the Video button. If you would like to view a video file independent of your recording data, you can also do this by opening the Video module application directly from the Trodes install directory.
Exporting Your Data
Data export is done using the “Open Playback File” option in Trodes. Once you have opened the desired video file in playback mode, you can use the following steps to export your data in the desired format. For more detailed information about data export, see Exporting Data and Export Utility Functions.
Select “Extract…” under the File dropdown menu.
A window will open allowing you to select how you would like to export the data. More than one option can be selected.
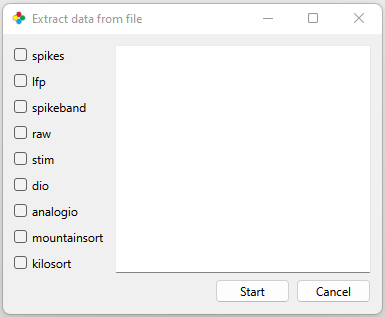
Figure 5: Trodes Export Utility extraction options
The checkbox options allow you to export your data in the following ways:
Spikes: exports spike waveform snippets
Lfp: exports low-bandpass filtered local field potential (LFP) data
Spikeband: exports bandpass filtered continuous data containing spikes
Raw: exports broadband unfiltered continuous data
Stim: exports current trace data for each channel when using stimulation-capable headstages and SHCU
Dio: exports digital input and output data
Analogio: exports analog input and output data
Mountainsort: exports broadband raw data whitened and referenced for import into Mountainsort
Kilosort: exports bandpass filtered spikeband data, segmented into user-defined sorting groups for import into Kilosort
Once you have selected your desired export formats, hit “Start” to begin data export.
NOTE: The command line can be used for more advanced export options, such as exporting data for further analysis with Offline Sorter. More information about this and other command line export functions can be found under Export Utility Functions.
Importing Your Data For Further Analysis With Matlab, or Python
Once you have exported your data, if you’d like to import your data into Matlab or Python, you can find utility scripts for doing this packaged with Trodes. You can find these scripts in the following locations:
Matlab: Trodes folder > Resources > TrodesToMatlab
Python: Trodes folder > Resources > PythonToMatlab
For more information about these scripts as well as additional information about Trodes data structures, please see Exporting Data and Export Utility Functions.