SD Card Setup
A Note on SD Card Headstage Configuration
Before a SpikeGadgets data logging headstage can be used for untethered recording, it must first be configured, then enabled. Historically, the headstage was configured by saving configuration settings to the SD card used to record. This process has been streamlined via firmware update, and headstage configuration settings are now stored in the headstage’s flash memory and can be updated via Trodes. This makes it easier to use the same SD card with multiple headstages and makes SD card configuration unnecessary in most situations.
Mounting SD Cards
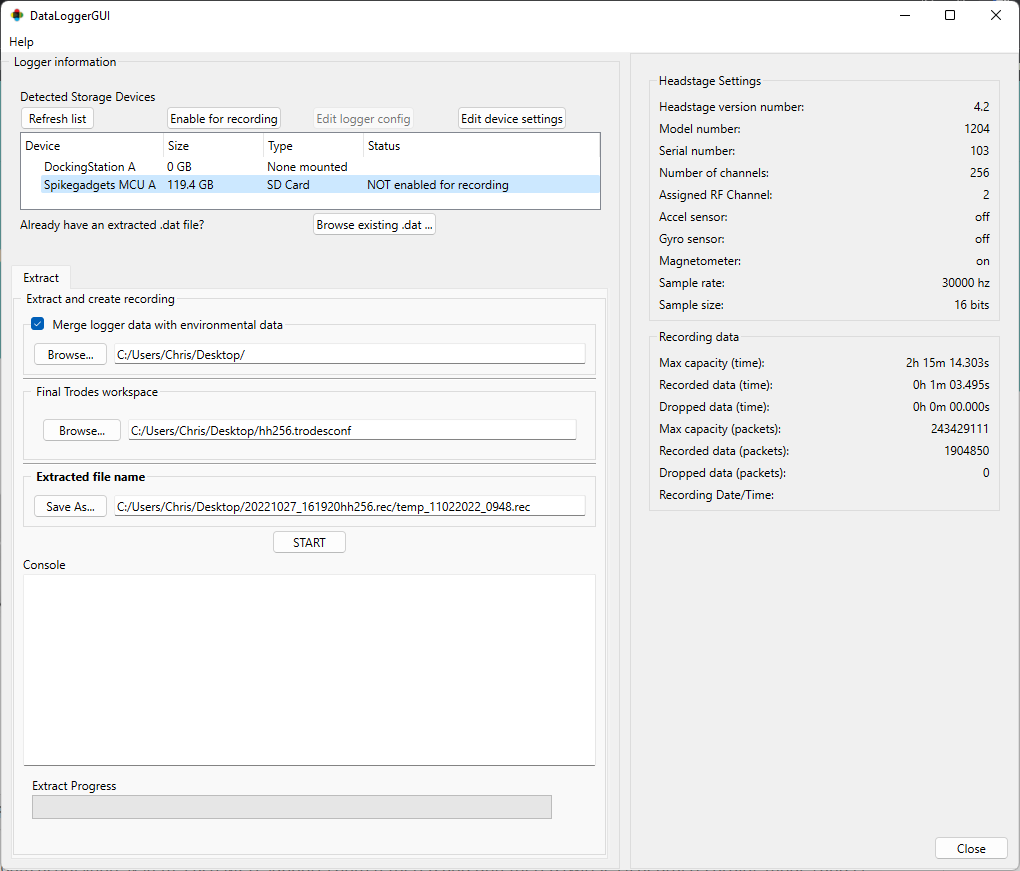
figure 1: Data Logger GUI with SD card mounted in MCU
Once you have finished your recording, you need to download the data to your computer. This can be done using your control unit (Logger Dock or MCU), or by directly connecting the SD card to your computer (Trodes 2.5 or later).
Control Unit
To start this process, insert the SD card into the Logger Dock or MCU. The Logger Dock or MCU should be turned on and connector to your computer via a USB connection. After opening the Data Logger GUI, The SD card will be listed with the control unit you are using under “Detected Storage Devices”. If your control unit does not appear on this list, click the refresh list button, and it should appear.
NOTE: The MCU must be running firmware version 3.19 or later to be used with the DataLoggerGUI.
The SD card will appear in the device list under the “Type” heading of your control unit, with information about card size and status listed. If data has been recorded on the SD card, the right-hand Headstage Setting panel will populate with information about the recording, and the card status will indicate that the card is “Not enabled for recording”. This is a safety feature to prevent accidental erasing of data before it had been downloaded to your computer. After you have downloaded the data, you will need to enable the card for recording before it can be used to record with a SpikeGadgets datalogger again. This is done by clicking the “Enable for recording” button.
Direct access
Downloading your SD using direct access is a new feature in Trodes 2.5. Direct access allows you you to connect your SD card directly to your computer via a USB SD card reader connected to your computer, or your computers built-in SD slot (if it has one). This method of data download can be up to ~4x faster than downloading your data using the Logger Dock or MCU; speeds are limited by your computer’s hardware. For optimal download speeds, a USB 3.0 SD card reader or built-in SD card reader are recommended.
WARNING: Please read the notes for use below, incorrect usage of this feature can result in catastrophic data loss!
Important notes about using Direct Access:
In addition to downloading data, this feature can also be used to enable your SD card. Extreme caution must be taken to avoid using this feature on any remote storage device that is not SD storage intended for untethered data logging. This is because enabling the card removes all file architecture from the storage device. For any normal storage volume this includes any drive partitions, which are necessary for your operating system to recognize the drive and read the data. Several safeguards have been implemented to avoid accidental data loss.
Only removable storage devices are listed. This makes it very unlikely that the drive containing your computer’s main storage and operating system will be selected (unless you are using removable drives for these purposes, which is rare).
The DataLoggerGUI requires Administrator privileges (Windows) or Superuser access (Linux).
The GUI looks for a partition table before initiating any changes to a connected device. If a partition table is detected, the GUI will ask you to confirm your action before it will be initiated. All removable storages devices under normal use require a partition table to be recognized by your operating system. Under normal circumstances, the only time a partitioned device should be enabled is when enabling an SD card for the first time prior to recording.
Windows-users:
When connecting an SD card used for logging data to a Windows computer, the operating system will immediately ask you to format the drive. This should be avoided! Formatting the drive will erase all data recorded to the SD card.
SD Card Enable
Once a SD card has been used to record data, it must be re-enabled before it can be used to record again. This prevents data on the SD card from being accidentally overwritten. This must also be done when using a SD card for the first time, and can be done either using the DataLoggerGUI, or the MCU (if running firmware 3.19 or later).
DataLoggerGUI: Mount the SD card to either the Logger Dock, MCU (if running firmware 3.19 or later), or computer (if running Trodes 2.5.0 or later) select this relevant device from the device list in the DataLoggerGUI, then select the above “Enable for recording” button. If using Direct Access, you may be prompted to confirm your decision.
MCU: Mount the SD card to the MCU, then press and hold the left button on the MCU. The left LED will rapidly flash red for a few seconds while the card is being enabled. Once the card has been enabled the LED will return to solid green and the button can be released.
SD Card Data Syncing and Merging
When an untethered recording session is completed, the neural data in a .dat format on the SD card.
This data must first be extracted from the SD card, then converted into the .rec format, which is
usable by the Trodes application suite. This data is often then merged with environmental data recorded by Trodes.
During the merge process, the neural data and environmental data are aligned using the radio frequency (RF)
sync pulses sent from the control unit to the headstage that have been recorded by both system. The data merging
and syncing process can either be done using the Data Logger GUI or from the command line.
For more information about data syncing and merging using the Data Logger GUI, please see the untethered syncing and Data Logger GUI subsections of the wiki.
Merging Data Using the Command line
If merging neural and environmental data using the command line is preferable, this can be done using the
mergesdrecording command line utility found in the Trodes application folder.
In addition to the SD and Trodes recording files, you will also need the “Final Trodes workspace” file. This workspace file will be appended to your recorded data, and will include the relevant header data for your neural recording. Importantly, this is not the workspace file used to record your environmental data, but rather a workspace containing all the settings that would have been used if the neural data was acquired using a tethered recording, such as channel count, nTrode assignment, etc.
To use mergesdrecording, simply open the command line, set your current directory to the Trodes application folder, and call mergesdrecording with the relevant input arguments.
Input Arguments:
rec <filename> - Recording filename from Trodes ending in .rec
sd <filename> - Recording filename from SD ending in .rec
numchan <integer> - Number of neural recording channels in SD recording
mergeconf <filename> - Workspace file used for merging ending in .trodesconf
Optional arguments:
output <filename> - Filename assigned to the merged output file
outputdirectory <directory> - Directory the output file is saved to
mergesdrecording is called using the following syntax:
mergesdrecording -rec [ENVIRONMENTALRECORDING.rec] -sd [SDRECORDING] -numchan [NUMCHANNELS] -mergeconf [WORKSPACE.trodesconf]
Below is an example of how this would look when merging an untethered recording using the HH128 128-channel headstage with ECU data recorded in Trodes.
PATH/TO/TRODES/mergesdrecording -rec PATH/TO/ECU/RECORDING/myRecording.rec -sd PATH/TO/RECORDING/sdFile.dat -numchan 128 -mergeconf 128_Tetrodes_ECU_Sensors.trodesconf
“PATH/TO/TRODES/” can be omitted if your current directory is already set to the Trodes application folder.
If you do not need to merge the data with a simultaneously recorded environmental record from the MCU and ECU, sdtorec can be used to simply append the “Final Trodes Workspace” to your SD recording. Syntax and input arguments are the same as above, with the omission of -rec.
sdtorec -sd [SDRECORDING.dat] -numchan [NUMCHANNELS] -mergeconf [WORKSPACE.trodesconf]